The Paperbell Client Management Tool for Coaches
Paperbell is a revolutionary scheduling, billing, and project management tool designed specifically for coaching professionals. All in one place, customers can schedule their appointments, sign contracts, download digital downloads, make payments – both for payment plans, ongoing subscriptions, and one-time payments, and sign up for individual – including multi-session packages, or group coaching.
Free to try out with your first client! No credit card needed to get started
Ease of use
Features
Functionality
Price/Value
Pros
Cons
The links in this post may be affiliate links. That means that if you click them and make a purchase, this site makes a commission. It will have no impact on the price you pay or the experience of your purchase.
Are you looking for a user-friendly, all-in-one streaming platform that won’t break the bank? Look no further than Streamyard!
In this Streamyard review, we’ll dive into this popular live broadcasting tool’s pricing, features, and overall experience. Whether you’re a content creator, marketer, or business owner, Streamyard has something to offer for all your streaming needs.
Understanding StreamYard
StreamYard is a versatile live broadcasting tool that has gained popularity among content creators, marketers, and business owners.
But what exactly is StreamYard, and how does it work?
Let’s dive deeper into the features and functionalities that make StreamYard a top choice for live streamers.
At its core, StreamYard is a web-based streaming platform that allows you to broadcast live videos to various social media platforms such as Facebook, YouTube, and LinkedIn.
It simplifies going live by providing a user-friendly interface that doesn’t require any technical expertise. With just a few clicks, you can start streaming high-quality videos to your audience.
One of the key features of StreamYard is its ability to handle multiple guests in your live stream.
Whether you want to host interviews, panel discussions, or Q&A sessions, StreamYard makes it easy to invite multiple participants to join your broadcast.
The platform also offers seamless integration with other streaming tools such as OBS (Open Broadcaster Software) and RTMP (Real-Time Messaging Protocol), giving you even more flexibility and control over your live streams.
StreamYard also provides a range of interactive features to engage your audience.
From adding custom overlays, logos, and backgrounds to displaying real-time comments and reactions, you can enhance the visual appeal of your streams and create a more interactive viewing experience.
Additionally, StreamYard allows you to share your screen, making it perfect for presentations, product demos, and educational webinars.
Its affordable pricing plans make StreamYard accessible to individuals and businesses with limited budgets.
The free version of StreamYard offers basic features. At the same time, the paid plans unlock additional functionalities such as branding customization, longer broadcast durations, and the ability to stream to multiple platforms simultaneously.
Streamyard Pricing Overview
If you’re looking for an affordable streaming platform that won’t break the bank, Streamyard is the perfect choice.
Streamyard offers a range of pricing plans to suit different budgets and streaming requirements.
Streamyard Free Plan
The platform’s free plan is a great option for those just starting out or with limited streaming needs.
With the free plan, you can broadcast live videos for up to 20 hours per month and stream to platforms such as Facebook, YouTube, and LinkedIn.
However, keep in mind that the free plan does come with some limitations, such as the Streamyard watermark on your streams and the inability to stream to multiple platforms simultaneously.
Streamyard offers three paid plans for those requiring more features and flexibility: Basic, Professional, and Business.
Streamyard Basic Pricing Plan
The Basic plan is priced at $25 per month and includes all the features of the free plan, plus the ability to remove the Streamyard watermark and brand your streams with custom logos and overlays.
You also get access to features such as multi-streaming to up to 3 platforms, longer broadcast durations, and adding up to 6 on-screen participants.
If you’re a content creator, marketer, or business owner looking for even more advanced features, the Professional and Business plans might be a better fit.
Streamyard Professional Pricing Plan
The Professional plan, priced at $49 per month, includes all the Basic plan features, with additional benefits such as streaming to up to 8 platforms simultaneously, custom RTMP destinations, and priority customer support.
Streamyard Business Pricing Plan
The Business plan, priced at $99 per month, offers all the features of the Professional plan, plus the ability to add your own branding to the Streamyard dashboard and access to advanced analytics.
Regardless of the plan you choose, Streamyard offers exceptional value for money. With its affordable pricing plans and extensive features, Streamyard stands out as a cost-effective option for live streaming.
Whether you’re a small business owner looking to promote your products or a content creator looking to engage with your audience, Streamyard has the pricing options to fit your needs.
So, if you’re ready to take your live streaming to the next level, Streamyard is definitely worth considering.
Highlighting StreamYard’s Features
Streamyard has various features that make it a standout choice for live streaming. Here are some key features that make Streamyard an exceptional streaming platform.
Social Broadcasting
First and foremost, Streamyard allows you to effortlessly broadcast your live videos to popular social media platforms such as Facebook, YouTube, and LinkedIn.
With just a few clicks, you can go live and reach your audience across multiple channels. Whether you’re a content creator, marketer, or business owner, this feature is invaluable in expanding your reach and engaging with your followers.
Streamyard also offers seamless integration with other streaming tools, such as OBS and RTMP, giving you the flexibility and control you need for professional live streams.
If you’re already familiar with these tools or want to enhance your streaming capabilities, Streamyard makes integrating them into your workflow easy.
Multiple Guests
One of the standout features of Streamyard is its ability to handle multiple guests in your live stream.
This is perfect for hosting interviews, panel discussions, or Q&A sessions. You can easily invite participants to join your broadcast and interact with them in real time.
This not only enhances the engagement of your live streams but also allows you to collaborate and connect with others in a meaningful way.
Customization options for live streaming
Streamyard also provides a range of interactive features to enhance your live streams. You can customize your streams with overlays, logos, and backgrounds, giving your broadcasts a professional look. Additionally, you can display real-time comments and reactions from your audience, making them feel more involved and connected to your content. Streamyard even allows you to share your screen, making it ideal for presentations, product demos, and educational webinars.
Affordability
Another great feature of Streamyard is its affordability. With pricing plans to suit different budgets, Streamyard ensures that live streaming is accessible to individuals and businesses alike. The free plan offers basic features and is a great starting point for beginners, while the paid plans unlock additional functionalities such as branding customization, longer broadcast durations, and the ability to stream to multiple platforms simultaneously.
Who is StreamYard Best For?
Content creators
If you’re a content creator who wants to engage with your audience and expand your reach, Streamyard is an excellent choice. With its seamless integration with popular social media platforms like Facebook and YouTube, you can easily go live and connect with your followers in real time.
Streamyard allows you to broadcast to multiple platforms simultaneously, making it even easier to reach a wider audience.
Additionally, the ability to customize your streams with overlays and logos gives your broadcasts a professional look and helps you stand out from the crowd.
Marketers
For marketers, Streamyard provides a powerful tool for promoting products or services. With the ability to share your screen, you can easily conduct product demos and educational webinars, showcasing the value of your offerings.
The interactive features, like displaying real-time comments and reactions, allow you to engage with your audience and gather valuable feedback.
Streamyard’s affordability also makes it a great option for businesses with limited budgets.
Business owners
If you’re a business owner looking to connect with your team or conduct remote meetings, Streamyard has got you covered.
The platform’s ability to handle multiple guests in your livestream makes it ideal for hosting panel discussions, Q&A sessions, or even virtual conferences.
You can easily invite participants to join your broadcast and collaborate with them in real time. Streamyard’s integration with RTMP allows seamless streaming to custom destinations, giving you even more flexibility and control over your live streams.
Pros of Using StreamYard
If you’re considering using Streamyard for your live streaming needs, you’re in for a treat! This versatile platform offers many benefits, making it a top choice for content creators, marketers, and business owners.
Let’s take a look at some of the pros of using Streamyard.
User friendly interface
One of the standout advantages of Streamyard is its user-friendly interface. Whether you’re a beginner or an experienced live streamer, Streamyard’s intuitive platform makes it incredibly easy to navigate.
You don’t need any technical expertise to get started – with just a few clicks, you can go live and start engaging with your audience.
Streamyard also provides a comprehensive tutorial section that guides you through the entire process, ensuring you have all the information needed to create professional live streams.
Seamless Integration
Another major advantage of Streamyard is its seamless integration with popular social media platforms like Facebook and YouTube.
With just one click, you can broadcast your live videos to multiple platforms simultaneously, expanding your reach and maximizing audience engagement.
Streamyard’s integration with RTMP also allows for streaming to custom destinations, giving you even more flexibility and control over your live streams.
Great for hosting podcasts, panels, and more
One of the standout features of Streamyard is its ability to handle multiple guests in your live stream.
Whether you’re hosting interviews, panel discussions, or Q&A sessions, Streamyard makes it easy to invite and collaborate with participants in real time.
This feature enhances the engagement of your live streams and allows for meaningful interactions with your guests.
Streamyard even offers features like split-screen views and the ability to highlight individual guests, making your live streams visually appealing and professional.
Promotes engagement and interaction
Streamyard also offers a range of interactive features that make your live streams more engaging.
You can add custom overlays, logos, and backgrounds to give your broadcasts a professional look and feel.
Additionally, you can display real-time comments and reactions from your audience, creating a sense of community and involvement.
These interactive features make your live streams more immersive and increase viewer engagement.
Affordable
Streamyard’s affordability is a major pro for those with limited budgets.
The free plan offers basic features perfect for beginners or those just starting out. The paid plans unlock additional functionalities such as branding customization, longer broadcast durations, and the ability to stream to multiple platforms simultaneously.
With its affordable pricing options, Streamyard provides exceptional value for money compared to other live streaming platforms.
For instance, by utilizing the Streamyard Facebook integration feature, a small business can effortlessly live stream product launches or tutorials, boosting brand visibility and customer engagement without breaking the bank.
Ability to attract subscribers and followers
Additionally, with the Streamyard YouTube integration, marketers can use YouTube’s broad audience base to increase brand exposure and attract new subscribers.
The host of Streamyard features is designed to create a rewarding live streaming experience that doesn’t compromise on functionality or quality.
Whether you opt for Streamyard Facebook or Streamyard YouTube integration, you are provided with easy-to-use tools that elevate your live streaming to a new level.
This allows you to effortlessly build an active community around your content and increase your online presence.
Cons of Using StreamYard
While Streamyard offers numerous benefits and is a top choice for many live streamers, there are a few drawbacks to consider. Let’s take a closer look at the cons of using Streamyard.
Lacks advanced customization options
One of the main drawbacks of Streamyard is the inability to customize your streaming settings. Unlike other streaming platforms, Streamyard does not offer advanced options for encoding settings or bitrate adjustments.
This may be limiting for more experienced streamers who require precise control over their streaming quality.
However, for most content creators and businesses, the default settings provided by Streamyard should be more than sufficient.
Limited streaming platforms
Another downside to using Streamyard is the limited number of platforms you can stream to simultaneously. While the paid plans allow for multi-streaming up to 8 ways, other streaming tools offer even more options.
This may be a drawback if you have a large online presence and want to reach your audience simultaneously across multiple platforms.
However, for most users, the ability to stream to platforms like Facebook, YouTube, and LinkedIn should be more than enough.
Lacking advanced analytics
One common complaint about Streamyard is the need for advanced analytics. While the platform provides basic metrics such as viewer count and engagement, it needs to provide detailed analytics to help you understand your audience and improve your live streams.
This may be a drawback for marketers and businesses that rely heavily on data-driven insights.
However, other third-party tools can integrate with Streamyard to provide more robust analytics if needed.
Limited free plan
Finally, Streamyard’s free plan does come with limitations that may be a downside for some users.
The free plan includes a Streamyard watermark on your streams and does not allow for streaming to multiple platforms simultaneously.
While these limitations are understandable considering the affordability of the free plan, it may be a drawback if you require a more professional and branded streaming experience.
Streamyard offers numerous benefits and is a user-friendly streaming platform. There are a few cons to consider.
These include limited customization options, the inability to stream to many platforms simultaneously, the lack of advanced analytics, and the limitations of the free plan.
However, for most content creators, marketers, and businesses, these drawbacks are outweighed by the platform’s ease of use, interactive features, and affordability.
Streamyard Social Media Integration
Streamyard makes it incredibly easy to integrate with popular social media platforms, such as Facebook, YouTube, and LinkedIn.
This seamless integration allows you to effortlessly reach your audience across multiple channels with just a few clicks. Whether you’re a content creator, marketer, or business owner, this feature is invaluable in expanding your reach and maximizing audience engagement.
Streamyard and Facebook
When it comes to integrating Streamyard with Facebook, the process is simple. With Streamyard’s easy-to-use interface, you can easily connect your Facebook account and broadcast your live videos directly to your Facebook page or group.
This integration not only allows you to reach your Facebook followers in real time but also provides the opportunity for them to engage with your content through comments, reactions, and shares.
Streamyard and YouTube
YouTube integration is just as seamless with Streamyard. With the click of a button, you can connect your YouTube account and start streaming live videos to your YouTube channel.
This integration opens up a whole new world of possibilities for content creators and businesses looking to engage with their YouTube audience.
You can conduct live Q&A sessions, host panel discussions, or even showcase product demos, all while interacting with your viewers in real time.
Streamyard and LinkedIn
LinkedIn integration is another standout feature of Streamyard. Connecting your LinkedIn account lets you stream live videos directly to your LinkedIn profile or company page.
This integration is perfect for professionals, businesses, and organizations looking to engage with their LinkedIn network and share valuable insights, presentations, or industry updates.
Streamyard RTMP
In addition to its social media integration, Streamyard also offers integration with RTMP (Real-Time Messaging Protocol).
This means you can stream your live videos to custom destinations, giving you even more flexibility and control over your live streams.
Whether you want to stream to a specific website, platform, or custom application, Streamyard’s RTMP integration allows you to do so with ease. Streamyard’s social media integration capabilities are top-notch.
Whether you want to reach your audience on Facebook, YouTube, LinkedIn, or any other custom destination, Streamyard has you covered.
The user-friendly interface and seamless integration make it effortless to connect your accounts and start streaming high-quality videos to your audience across multiple platforms.
How To Use Streamyard
Sign up
Start by signing up for an account. You can do that by going to Streamyard.com.
As soon as you signed up by putting your email, StreamYard will send you a six-digit code to your email which will allow you to proceed to the next step.
Add a destination
To add a destination, click on the platform you are interested in sharing your live broadcast. A user must authorize StreamYard to have access to such a destination.
Users wanting to use Facebook can choose to live stream to their profile, group, page, or both (profile, group, and page). This also applies to LinkedIn users where they can choose to live stream to their profile, page, or a combination of both.
Broadcast
After connecting your chosen destination with StreamYard, the next thing is to create a broadcast. To do so, you will need to go to the broadcast tab and click on the Create Broadcast button.
A box will pop up when you click on the Create Broadcast button with additional options. These options include clicking on the existing connected destination(s), adding more destination(s), and even recording your activity without live streaming.
Then you will need to provide a title and description for your stream.
If you like to pre-plan and set up things in advance, you have the option to schedule the broadcast for later so that it is ready to go and you can get a link to send to guests ahead of time.

After completing all of that, you will need to save the changes by clicking the Create Broadcast button on the Enter Broadcast Studio button.
When you click the Create Broadcast button, you will be asked to check your camera and mic before entering into the Broadcast Studio.

The Streamyard Broadcast Studio
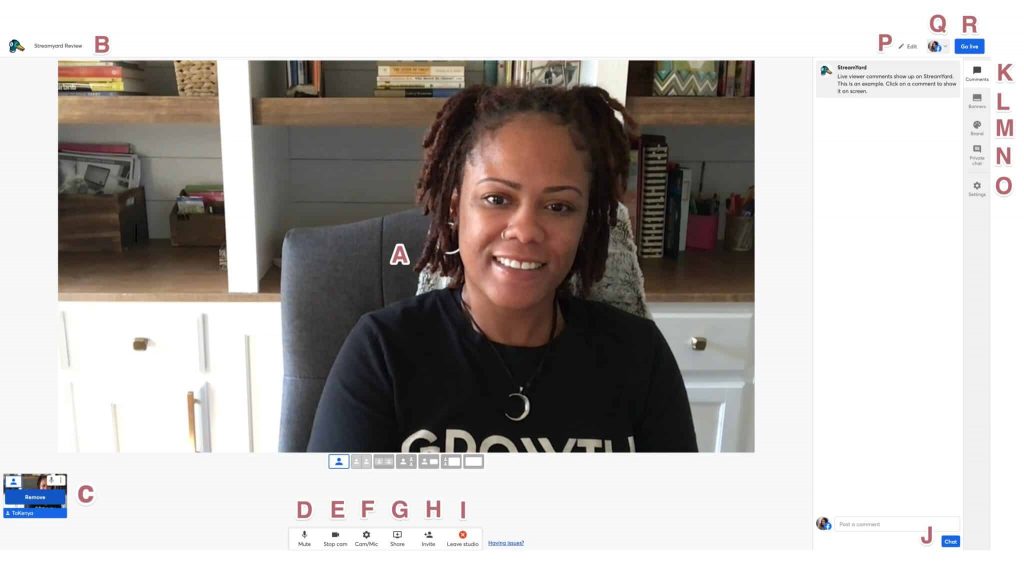
A. Display
This is what viewers of your broadcast will see. The buttons below the display allow you to select different screen display settings.
B. Title
This is the name you gave the broadcast in the settings.
C. Participants
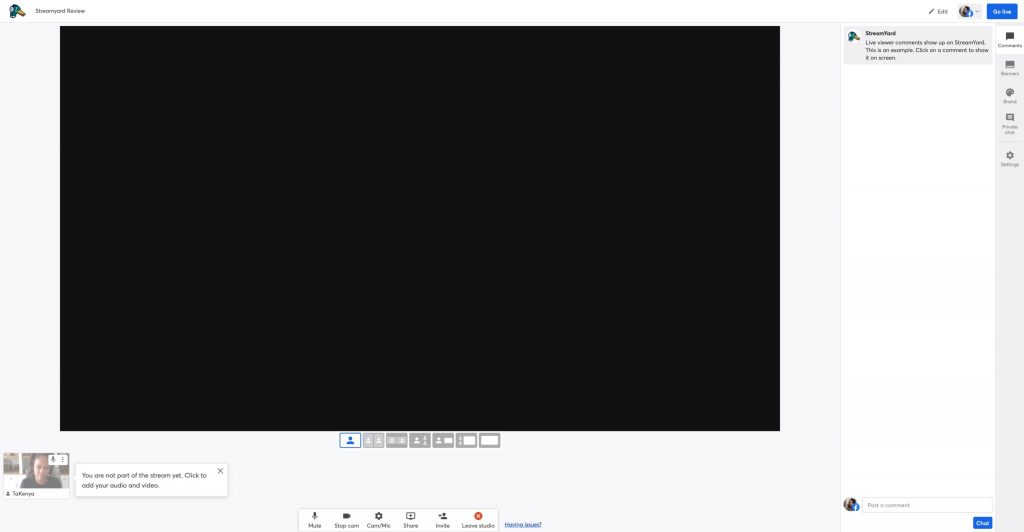
This is where all the broadcast participants will show up including the host. It is worth noting that even you as the host are not part of the broadcast until you add yourself to the stream. Once the host clicks on a participant’s display video, an Add to stream button will appear.
D. Mute
The mute function is to allow participants to mute themselves. This is helpful when a participant is not speaking to minimize the background noise coming from their stream.
For someone to enable the mute function, just click on the mic/mute button and it will automatically cancel and mute the guest’s mic. When speaking the guest will also need to unmute the mic so that their voice will be able to be heard again. This can be done by clicking the mic/mute button again.
E. Stop Cam
When a user clicks on Stop Cam it blacks out the camera of the user so that a black screen will replace the guests display video.
F. Cam/Mic
The Cam/Mic setting consists of five different sub-settings:
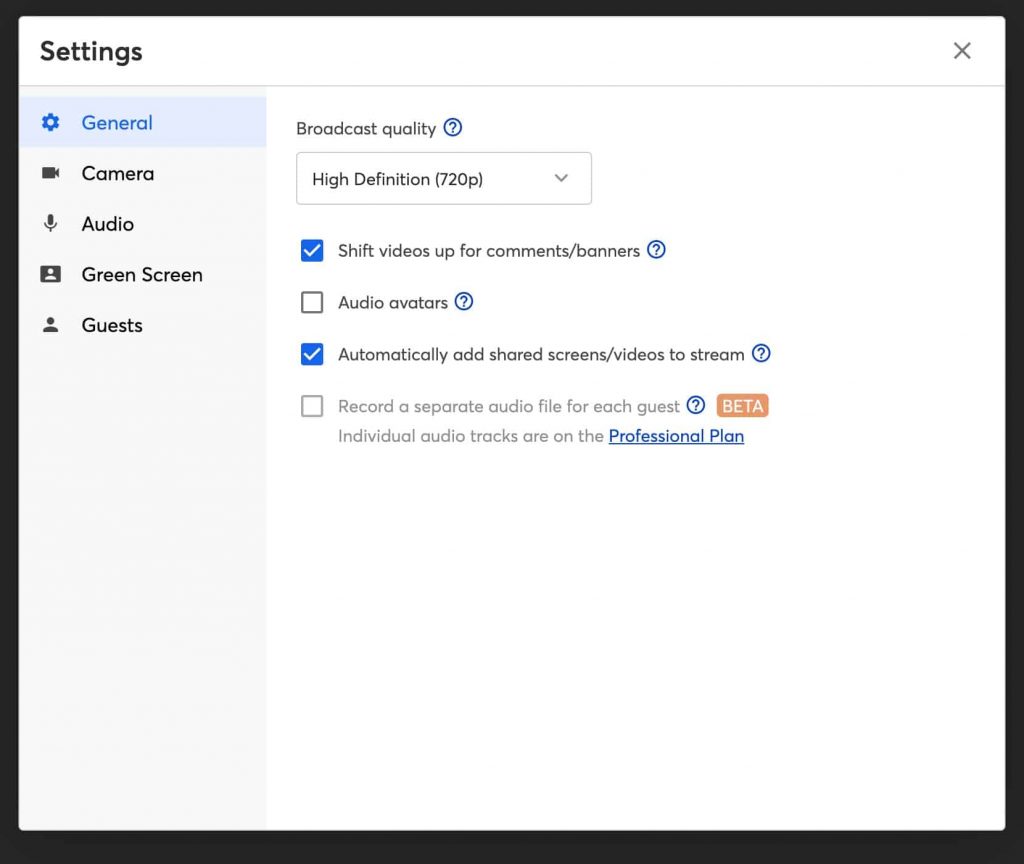


- General settings – the user can control the quality of the broadcast, enable audio avatars, and adjust the position of the banners and where comments appear.
- Camera Settings – allows a user to use an inbuilt camera or an external webcam. And allows you to see what your video and quality will appear like to viewers. In addition, the setting also gives the ability to select the camera resolution (high definition, standard definition or low definition.
- Audio settings – allows users to test speakers and mic, and a few other audio settings to control the quality of the streams audio.
- Green Screen settings – enables users to use, choose and upload virtual backgrounds.
- Guest settings – allows a host to enable guests tobe able to see viewers comments, play a sound when a guest enters the stream, and the ability to force guest to authenticate with YouTube or Facebook.
G. Screen Share
This setting allows a user to share a screen when presenting – an application window or a specific tab.
H. Invite
Allows a host to invite additional guests to enter the broadcast studio through either a link or an email.
I. Leave Studio
This is where the host or guests can click and exit from the broadcast studio.
J. Chat
This is where your viewer’s comments display and you can respond within the broadcast studio.
K. Comments
The comment function allows you to display live viewer comments on the broadcast screen while streaming.
L. Banners
This feature allows the host to display talking points and call to action.
M. Brand
Allows a host to customize the look of the display screen. The host can change the look and feel including the color, theme, logo, and background to fit with their brand. It is worth noting that this feature is for premium subscribers.
N. Private Chat
This is a space where the host can chat privately with the broadcast participants.
O. Settings
This is another place that brings up the same settings as section F.
P. Edit Original Settings
This gives a dialogue box that allows you to edit the stream locations, title, and description.
Q. Edit Stream Settings
Prompts a dialogue box that allows you to see/edit broadcast settings.
R. Go Live/Record
Is the button where the host will click to record the broadcast. But, if the host sets the stream to go live, the button will display Go Live
;TLDR
Looking for a user-friendly, all-in-one streaming platform that won’t break the bank?
Streamyard is the answer. In this Streamyard review, we’ve explored this popular live broadcasting tool’s pricing, features, and overall experience.
Whether you’re a content creator, marketer, or business owner, Streamyard has something to offer for all your streaming needs.
Streamyard simplifies the process of going live with its web-based platform that doesn’t require any technical expertise. It allows you to broadcast high-quality videos to popular social media platforms like Facebook, YouTube, and LinkedIn.
The ability to handle multiple guests in your livestream is a standout feature, perfect for interviews, panel discussions, and Q&A sessions. The interactive features like overlays, logos, and real-time comments enhance your streams’ visual appeal and engagement.
Streamyard offers a range of pricing plans to suit different budgets, including a free plan with basic features and paid plans with additional functionalities.
The platform seamlessly integrates with social media platforms like Facebook and YouTube and also offers RTMP integration for streaming to custom destinations.
In summary, Streamyard is a cost-effective streaming platform with user-friendly features, making it an excellent choice for content creators, marketers, and business owners.
With its affordable pricing options and extensive capabilities, Streamyard stands out as a top choice for all your live streaming needs.
Overall rating

TaKenya
A life and business coach at TaKenya Hampton Coaching, owner of Studio117 Creative, and the girl behind the stove or drill at the Kenya Rae Blog. A total WordPress geek and lover of systems that help businesses run smoothly. My goal is to make things look good, work well, and help business owners reach their full potential—whether they’re working solo as a solopreneur or with a team.