How to Show Your Out of Office Dates on WordPress and in Your Client Portal

Written By: TaKenya
Published: November 19, 2026

The links in this post may be affiliate links. That means that if you click them and make a purchase, this site makes a commission. It will have no impact on the price you pay or the experience of your purchase.
You can show clients your upcoming time off, right on your website or in your client portal, and have it update on its own every time you block time in Google Calendar. No plugins, no monthly fees, and no copying dates from one place to another.
If you run a service business, you know the drill. You take a long weekend, and you come back to three “just checking in” emails and one slightly panicked voicemail. Your auto-responder only helps after someone has already reached out. A visible out of office list helps before they do.
By the end of this post, you will have a small widget that:
- Reads the time you mark as Out of office in Google Calendar (or any event with a keyword you choose, like “OOO” or “Vacation,” in the title)
- Shows only the dates and times, never your event titles or anything else on your calendar
- Highlights time off that is happening right now with an “Out now” label
- Updates automatically, so you never touch it again after setup
I built this for my own business, and you can see mine live on my out of office page on my website.
I also added it to my Moxie client portal.
I hit a few walls along the way, and I am sharing those too, so you can skip right past them.
How it works
The setup has three small pieces that pass your dates along, one to the next:
- Google Calendar holds your time off, the same way it does now.
- A Google Apps Script (free, lives in your Google account) reads your calendar, keeps only the out of office events, and publishes the dates as a private data feed.
- A widget pulls from that feed and displays a clean list. On WordPress, the widget goes right on the page. In a client portal, it either goes right on the page too, or lives on a tiny free page that the portal shows in a window, depending on what your portal allows.
What you need
- A Google Workspace account. The “Out of office” event type is not available on personal Gmail. If you use personal Gmail, you can still follow along: just put a keyword like “OOO” in the title of your time off events.
- A WordPress site where you can add a Custom HTML block, and/or a client portal that lets you add custom code, embeds, or links. Step 3 covers what to check.
- A free Cloudflare account (only if your portal does not run scripts).
- A plain text editor. More on why that matters in the troubleshooting section.
Step 1: Create your calendar feed
This script is the engine. It checks your calendar, grabs your out of office time, and turns it into a simple list the widget can read.
- Go to Google Apps Script and click New project. Name it something like “Out of Office Feed.”
- Delete the starter code and paste in the code below.
- Update the three settings at the top of the code:
DAYS_AHEADis how far into the future the widget looks for time off, in days.182is about six months. Use90for about three months.TITLE_KEYWORDSis a list of words the script looks for in your event titles. Any event with one of these words in its title counts as time off, even if you did not create it as an Out of office event. Capitalization does not matter, so “ooo” and “OOO” both work. Add as many words as you like, each in quotes and separated by commas, like['OOO', 'Vacation', 'PTO']. Pick words that only show up in your time off events, since “Vacation” would also catch a meeting called “Vacation planning call.”TIMEZONEcontrols how dates and times display. Use your own time zone name, such asAmerica/New_York,America/Chicago,America/Denver, orAmerica/Los_Angeles.
// Settings
const DAYS_AHEAD = 182;                     // How far ahead to show time off, in days
const TITLE_KEYWORDS = ['OOO', 'Vacation']; // Events with any of these words in the title also count
const TIMEZONE = 'America/New_York';        // Your time zone

function doGet() {
  const cache = CacheService.getScriptCache();
  const cached = cache.get('ooo');
  if (cached) return json(cached);

  const cal = CalendarApp.getDefaultCalendar();
  const start = new Date();
  start.setHours(0, 0, 0, 0);
  const end = new Date(start.getTime() + DAYS_AHEAD * 86400000);
  const now = new Date();

  const events = cal.getEvents(start, end)
    .filter(e =>
      e.getEventType() === CalendarApp.EventType.OUT_OF_OFFICE ||
      TITLE_KEYWORDS.some(k => e.getTitle().toUpperCase().includes(k.toUpperCase()))
    )
    .map(e => {
      const s = e.getStartTime();
      const en = e.getEndTime();
      return Object.assign(label(e, s, en), { current: s <= now && en > now });
    });

  const payload = JSON.stringify({ updated: now.toISOString(), events: events });
  cache.put('ooo', payload, 300); // Refreshes every 5 minutes
  return json(payload);
}

function label(e, s, en) {
  const f = (d, p) => Utilities.formatDate(d, TIMEZONE, p);
  const fullDays = e.isAllDayEvent() ||
    (f(s, 'HH:mm') === '00:00' && f(en, 'HH:mm') === '00:00');

  if (fullDays) {
    const last = new Date(en.getTime() - 1);
    const a = f(s, 'EEE, MMM d');
    const b = f(last, 'EEE, MMM d');
    return { dates: a === b ? a : a + ' through ' + b, time: 'All day' };
  }
  if (f(s, 'yyyyMMdd') === f(en, 'yyyyMMdd')) {
    return { dates: f(s, 'EEE, MMM d'), time: f(s, 'h:mm a') + ' to ' + f(en, 'h:mm a') };
  }
  return {
    dates: f(s, 'EEE, MMM d, h:mm a') + ' through ' + f(en, 'EEE, MMM d, h:mm a'),
    time: ''
  };
}

function json(str) {
  return ContentService.createTextOutput(str).setMimeType(ContentService.MimeType.JSON);
}- Click Deploy, then New deployment. Click the gear icon and choose Web app.
- Set Execute as to Me and Who has access to Anyone.
- Click Deploy and approve the permissions. Google will warn you that the app is not verified. That is expected for your own script: click Advanced, then go to the project.
- Copy the Web app URL. It ends in
/exec.
Test it: open that URL in a private or incognito window. You should see plain text that starts with {"updated":. If you get a sign in screen instead, your access setting is not set to Anyone yet.
“Anyone” sounds scary, but the feed only ever shares dates and times. Your event titles, descriptions, and every other appointment stay private.
Changing the script later? Go to Deploy, then Manage deployments, click the pencil icon, and choose New version. That keeps your URL the same, so nothing else needs updating.
Step 2: Add the widget to WordPress
WordPress can run the widget directly on the page, so this part is a single copy and paste.
- Create a new page, or open the page where you want the list to show.
- Add a Custom HTML block.
- Paste in the code below and replace
PASTE_YOUR_WEB_APP_URL_HEREwith the URL from Step 1.
<div class="ooo-widget">
  <h3 class="ooo-widget__title">Out of Office</h3>
  <p class="ooo-widget__intro">I will not be responding to messages or working on projects during these times. Anything sent while I am away will be handled in the order it was received when I return.</p>
  <ul class="ooo-widget__list" id="ooo-list"><li>Loading...</li></ul>
</div>

<style>
  .ooo-widget { max-width: 640px; }
  .ooo-widget__intro { margin-bottom: 1rem; opacity: 0.8; }
  .ooo-widget__list { list-style: none; padding: 0; margin: 0; }
  .ooo-widget__list li {
    display: flex; justify-content: space-between; align-items: center; gap: 12px;
    padding: 12px 16px; margin-bottom: 8px; border-radius: 8px;
    background: #F5F5F5; border: 1px solid #F5F5F5;
  }
  .ooo-widget__date { font-weight: 600; }
  .ooo-widget__time { opacity: 0.75; font-size: 14px; white-space: nowrap; }
  .ooo-widget__now { background: #FDF3F2 !important; border-color: #C0392B !important; }
  .ooo-widget__badge {
    font-size: 11px; font-weight: 700; text-transform: uppercase; letter-spacing: 1.5px;
    color: #C0392B; margin-left: 10px;
  }
</style>

<script>
(function () {
  var URL = 'PASTE_YOUR_WEB_APP_URL_HERE';
  var list = document.getElementById('ooo-list');

  fetch(URL)
    .then(function (r) { return r.json(); })
    .then(function (data) {
      if (!data.events || !data.events.length) {
        list.innerHTML = '<li>No time off scheduled right now. I am available as usual.</li>';
        return;
      }
      list.innerHTML = data.events.map(function (e) {
        return '<li class="' + (e.current ? 'ooo-widget__now' : '') + '">' +
          '<span class="ooo-widget__date">' + e.dates +
          (e.current ? '<span class="ooo-widget__badge">Out now</span>' : '') +
          '</span>' +
          '<span class="ooo-widget__time">' + e.time + '</span></li>';
      }).join('');
    })
    .catch(function () {
      list.innerHTML = '<li>Availability could not be loaded. Please check back shortly.</li>';
    });
})();
</script>- Swap the colors to match your brand.
#F5F5F5is the row background, and#C0392Bis the “Out now” highlight. - Publish, and check the page in an incognito window to see what clients will see.
Want it for clients only? Set the page to Password protected in the page settings, or keep it out of your menus and mark it noindex in your SEO plugin. Then share the link with your active clients.
My own out of office page is set to noindex, so it stays out of search results, but I can link to it in emails or share it with clients whenever it is helpful.
Step 3: Add the widget to your client portal
Client portals handle custom content in different ways, so the first step is figuring out what yours allows. Some run code, some only allow embeds, and some only allow links. Here is how to check, and which version of the widget to use.
What your portal needs for this to work
Your portal needs to support at least one of these:
- Custom code that runs scripts. This is the easiest option. The WordPress code from Step 2 works as is.
- Embeds or iframes. Look for a block or setting called something like “embed,” “custom HTML,” or “iframe.” You will host the widget on its own small page and show it inside your portal.
- Links or buttons. If your portal only allows links, clients can open your out of office list in a new tab with one click.
Quick test: paste the WordPress code from Step 2 into your portal first. If your dates show up, you are done. If it gets stuck on “Loading…”, your portal does not run scripts, so use Option B. If the iframe in Option B gets stripped out or shows a blank box, use Option C.
Option A: Your portal runs custom code
Paste the code from Step 2 into your portal’s custom code or HTML area, with your URL from Step 1 in place. That is it. This version also resizes itself to fit however many dates you have.
Option B: Your portal allows embeds or iframes
Put the widget on its own tiny web page, hosted free on Cloudflare, then show that page inside your portal.
Create the widget page
- On your computer, create a folder called
ooo-widget. - Inside it, create a plain text file named
index.htmlwith the code below. ReplacePASTE_YOUR_WEB_APP_URL_HEREwith your URL from Step 1.
<!DOCTYPE html>
<html lang="en">
<head>
<meta charset="utf-8">
<meta name="viewport" content="width=device-width, initial-scale=1">
<meta name="robots" content="noindex, nofollow">
<title>Out of Office</title>
<style>
  body { margin: 0; font-family: Arial, sans-serif; font-size: 16px; color: #424242; background: #FFFFFF; }
  ul { list-style: none; padding: 0; margin: 0; }
  li { display: flex; justify-content: space-between; align-items: center; gap: 12px; padding: 12px 16px; margin-bottom: 8px; border-radius: 8px; background: #F5F5F5; border: 1px solid #F5F5F5; }
  li:last-child { margin-bottom: 0; }
  li.now { background: #FDF3F2; border-color: #C0392B; }
  .date { font-weight: 600; }
  .time { color: #666666; font-size: 14px; white-space: nowrap; }
  .badge { font-size: 11px; font-weight: 700; text-transform: uppercase; letter-spacing: 1.5px; color: #C0392B; margin-left: 10px; }
  @media (max-width: 480px) {
    body { font-size: 14px; }
    li { padding: 10px 12px; }
    .time { font-size: 12px; }
  }
</style>
</head>
<body>
<ul id="list"><li>Loading...</li></ul>

<script>
(function () {
  var URL = 'PASTE_YOUR_WEB_APP_URL_HERE';
  var MAX_ITEMS = 4; // How many upcoming entries to show
  var list = document.getElementById('list');

  function message(text) {
    list.innerHTML = '<li>' + text + '</li>';
  }

  fetch(URL)
    .then(function (r) { return r.json(); })
    .then(function (data) {
      if (!data.events || !data.events.length) {
        message('No time off scheduled right now. I am available as usual.');
        return;
      }
      list.innerHTML = data.events.slice(0, MAX_ITEMS).map(function (e) {
        return '<li class="' + (e.current ? 'now' : '') + '">' +
          '<span class="date">' + e.dates + (e.current ? '<span class="badge">Out now</span>' : '') + '</span>' +
          '<span class="time">' + e.time + '</span></li>';
      }).join('');
    })
    .catch(function () {
      message('Availability could not be loaded. Please check back shortly.');
    });
})();
</script>
</body>
</html>
This version shows your next 4 entries. That keeps the list a predictable size, which matters when it sits in an iframe. As dates pass, later ones move up automatically.
Put the page online with Cloudflare
- Log in to Cloudflare and click Create app under Ship something new.
- Choose Upload your static files.
- Name the project, drag in your
ooo-widgetfolder, and deploy. - Copy the address it gives you. It ends in
.workers.devor.pages.dev. - Open that address in a new tab. You should see your dates.
Add it to your portal
Paste this card into your portal’s embed or custom HTML area. Replace the src address with your Cloudflare address. If your portal has its own embed tool that only asks for a URL, give it your Cloudflare address instead.
<div style="background: #FFFFFF; border: 1px solid #E6E1DB; border-left: 4px solid #5DA3B3; border-radius: 11px; padding: 20px 24px; margin-bottom: 40px;">
    <p style="font-size: 18px; font-weight: 600; margin: 0 0 4px;">Out of Office</p>
    <p style="margin: 0 0 16px;">I will not be responding to messages or working on projects during these times. Anything sent while I am away will be handled in the order it was received when I return.</p>
    <iframe src="https://YOUR-PROJECT.YOUR-NAME.workers.dev/" title="Out of office dates" loading="lazy" style="display: block; width: 100%; height: 236px; border: 0;"></iframe>
</div>
An iframe cannot grow to fit its content on its own, so the height is set to fit 4 rows. If you change MAX_ITEMS, adjust height to match. If you have fewer entries coming up, the extra space blends into the white card.
Option C: Your portal only allows links
Follow the Create the widget page and Put the page online steps from Option B. Then add a link or button to your portal, something like “See my upcoming time off,” that opens your Cloudflare address in a new tab. It is one extra click for clients, but it still updates on its own.
How I set this up in my Moxie client portal
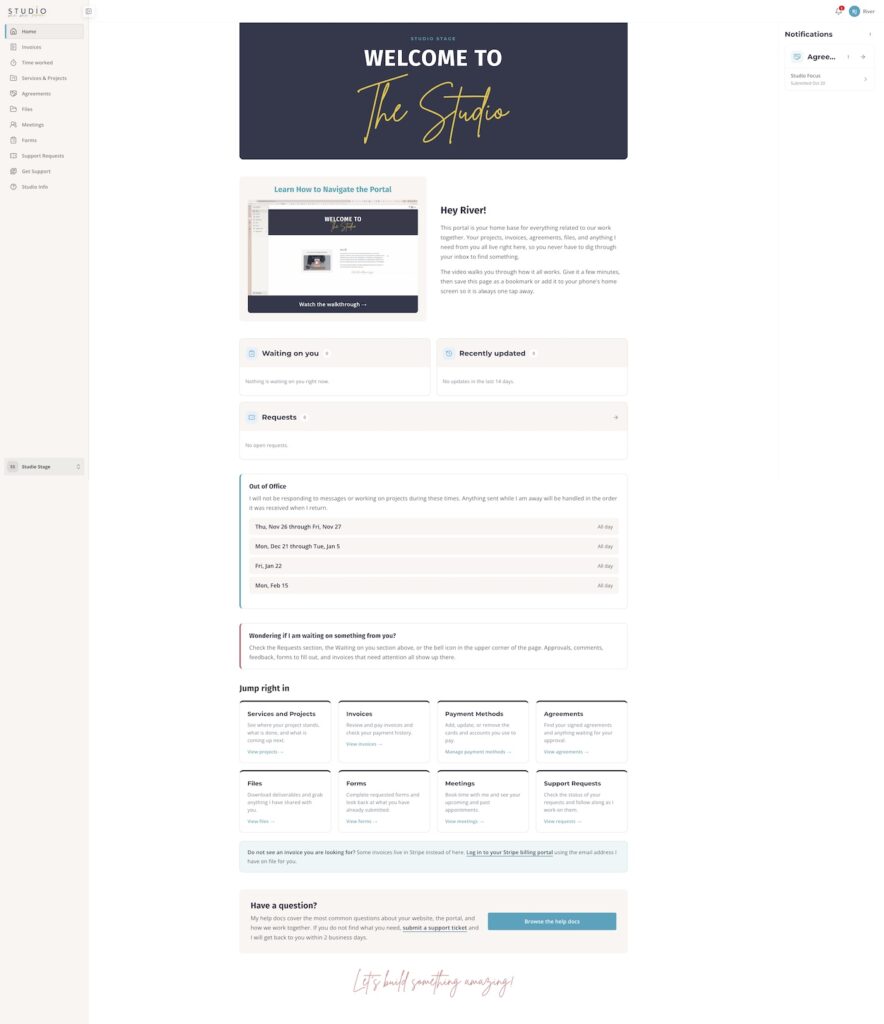
I run my business in Moxie, and my clients use the Moxie client portal for their projects, invoices, files, and requests. I wanted my out of office dates right on the portal homepage, so clients see them every time they log in.
Moxie does not run scripts on custom portal pages, so when I pasted in the Step 2 code, it got stuck on “Loading…” Moxie does allow iframes, though, so I went with Option B.
My widget page lives on Cloudflare, and the Out of Office card sits on my portal homepage, styled with my brand colors so it matches the rest of the page. I kept it to my next 4 entries so the card stays tidy.
Troubleshooting: the walls I hit so you do not have to
Your portal card says “Loading…” forever
Why it happens: Your portal does not run scripts. Moxie is one of these.
The fix: Use Option B from Step 3, the Cloudflare page and iframe, instead of the WordPress code.
A Google “You need access” page shows inside the portal
Why it happens: Google’s own pages do not play well inside iframes, especially for visitors signed into a Google account.
The fix: Do not put the Apps Script URL directly in the iframe. Use your Cloudflare page instead, since it only reads the data.
A jumble of codes like {\rtf1\ansi... shows around your list
Why it happens: Your file was saved as rich text. TextEdit on a Mac does this by default.
The fix: In TextEdit, choose Format, then Make Plain Text before saving. Make sure the file name ends in .html, not .rtf.
A gray box with a sad page icon shows instead of your dates
Why it happens: The iframe address is wrong, or the hosted page is set to private.
The fix: Open the address in its own tab. Check that it matches your Cloudflare address exactly and that the project is public.
You get a sign in screen when you test the Apps Script URL
Why it happens: The deployment is not set to Anyone.
The fix: Under Manage deployments, set Who has access to Anyone. On Google Workspace, your admin settings may need to allow sharing outside your organization.
New time off does not show up right away
Why it happens: The feed refreshes every 5 minutes.
The fix: Give it a few minutes. To change the timing, edit the 300 (seconds) in the script and deploy a new version.
A quick note on hosting: I tried Netlify first. It works, but new free Netlify projects now show a “Powered by Netlify” badge that sits right on top of the widget, and turning it off requires a paid plan. Cloudflare does not add a badge.
Set it once, then forget about it
Once this is in place, your only job is the one you already do: block your time off in Google Calendar. Your website and your client portal take it from there, and your clients know when to expect you before they ever hit send.
It is a small thing, but it is the kind of small thing that makes clients feel taken care of. Clear expectations up front mean fewer “just checking in” emails and a lot less guilt about actually taking your day off.
Want a hand getting this set up? I offer guided setup sessions where we build it together on a screen share. You stay logged in to your own accounts the whole time, so there are no passwords to hand over, and I will walk you through every step, from your calendar feed to your client portal.
By the end of the call, your out of office widget will be live and you will know exactly how to update it. Send me a note through my contact form, mention the out of office widget, and I will reach out to get your session scheduled.